

How To Set Up V Brakes On A Bike
past John Chocolate-brown, HaveFunBiking.com
For those who don't have disc brakes, the 5-brakes on your bike are your greatest single source of control. Take a look beneath for some tips and tricks on how to adjust your 5-brakes.
What Condition is Your V-Brakes In?
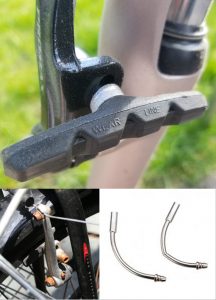
Before diving into adjusting your V-brakes, be sure to audit the restriction itself. Commencement thing to cheque for is excessive corrosion. Highly rusted bolts or springs can break resulting in a crash. Also expect for any bent or cleaved parts. The cradle on the left brake arm is there to concur the restriction noodle. If either the v-brakes noodle or cradle are aptitude (run across moving-picture show), your restriction might not part properly. Besides review the brake pads. The easiest way to do this is to remove the bike. Most pads have lines on them to indicate when they need to be replaced (run across picture). As well inspect the pad surface for bits of metallic that tin can damage the bicycles rim.
Cable status
At that place are two parts you demand to audit. The Brake cables, and the restriction housing. The cable is the wound steel cable that moves when you clasp the lever. The restriction housing can come in many dissimilar colors, merely is almost e'er rubber coated and has the cable run through information technology. Check the cablevision for rust, frays or kinks and replace if needed. Check the housing for cracks or splitting. Finally, check that the cable moves through the housing freely without resistance.
Rim condition
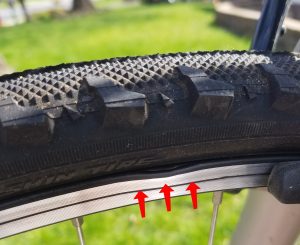
Spin the bicycle and check to see that your rim is direct and round. A wheel should not touch either brake pad as it rotates. It as well needs to remain as round equally possible. If the rim moves upward or downward too much, the brake pads can hit the tire, or run off the rim entirely. If the wheel isn't straight and round, exist sure to have information technology to your local wheel shop to have it trued. The other concern when checking the rim is wear. Most rims now have a article of clothing indicator built into the rim in the form of a recessed dot, or a recessed channel effectually the rim. Once the rim wears past the dot or aqueduct it is time to replace the rim.

Wear line
Rim Dent
Pad placement
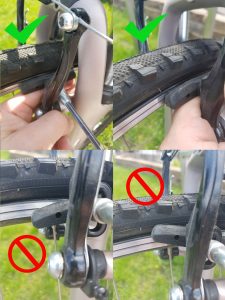
5-Brake pads get adapted past style of a 5mm fitting on the back side of the restriction pad. The pad sits on a pair of conical washers that allow the pad to be pivoted up to twenty degrees. I find the easiest style to suit the restriction pad is to concur the left brake with your right paw (or the right brake with your left hand) and place your pointer finger along the bottom of the pad (see image). Loosen the 5mm fitting with your hex wrench and utilise the wrench and your pointer finger to marshal the pad. To properly align the pad, you desire to center the pad betwixt the top and lesser border of the rim. The pad should exist positioned and then that no part hits the tire or misses the face of the rim.
Centering
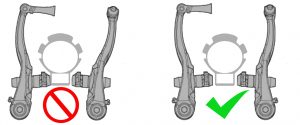
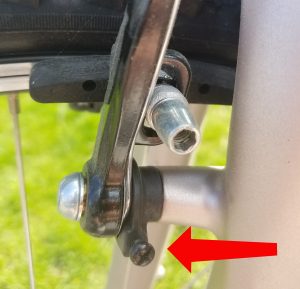
Once the pads are placed properly, the next affair to do is centre the brakes. Centering the brakes entails adjusting the restriction springs to ensure the pads are both an equal distance from the rim. Adjusting the brake springs is as simple every bit tightening or loosening the prepare screws at the bottom of each brake arm. I like to start on the restriction arm that has the near adjustment. I determine the amount of adjustment past how far in or out the adjustment screws are in the restriction (encounter image). The simply real tricky part of centering the brake is remembering that screwing the adjustment in volition move the pad away from the rim (the opposite of what y'all might look).
Cablevision tension on 5-brakes
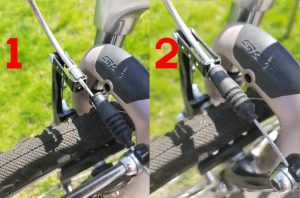
Once the pads are adjusted and the brakes are centered, you lot need to brand sure that the brake engages with the right amount of lever pull. I have found the easiest way to practise this is to position the finish of the cablevision noodle on the end of the restriction cradle (1), loosen the cable compression commodities, pull the cablevision tight, tighten the cablevision compression bolt, then position the noodle correctly (ii) and you are ready (see prototype).
Troubleshooting
One time you get washed, and test the brakes you may encounter some common problems like Squealing and grinding noises, or but no power. A few elementary tricks will resolve about of these issues.
- 1- The restriction pads may appear to be in corking shape, but due to age, be to hard to operate properly. Switching out the one-time pads for new ones can help quiet noisy brakes and add power
- 2- Pads that are exposed to long descents tin generate a hard glaze over the pad surface. A few quick brushes with a flat file can knock off the glaze and repose the brakes.
- iii- The rim surface tin can get contaminated over fourth dimension. Rubbing it down with sandpaper or steel wool can go a long way to increment braking power and reduce noise.
- 4- Depending on the restriction condition, there can exist excessive flex in the brake artillery. In order to combat noise you lot can "toe" the restriction pads by having the leading border make contact with the rim beginning.
- five- Finally, you can use a fiddling grease or oil to the restriction cables where they enter the housing.
Source: https://havefunbiking.com/products/bicycle-v-brakes/
0 Response to "How To Set Up V Brakes On A Bike"
Post a Comment